以 Executor 为例,分析MyBatis是如何为Executor实例植入插件逻辑的。Executor实例是在开启 SqlSession 时被创建的
1
2
3
4
5
6
7
8
9
10
11
12
13
14
15
16
17
18
| // -☆- DefaultSqlSessionFactory
public SqlSession openSession() {
return openSessionFromDataSource(
configuration.getDefaultExecutorType(), null, false);
}
private SqlSession openSessionFromDataSource(ExecutorType execType,
TransactionIsolationLevel level, boolean autoCommit) {
Transaction tx = null;
try {
// 省略部分逻辑
// 创建 Executor
final Executor executor = configuration.newExecutor(tx, execType);
return new DefaultSqlSession(configuration, executor, autoCommit);
}
catch (Exception e) {...}
finally {...}
}
|
Executor 的创建过程封装在 Configuration 中
1
2
3
4
5
6
7
8
9
10
11
12
13
14
15
16
17
18
19
20
21
22
| // -☆- Configuration
public Executor newExecutor(Transaction transaction,
ExecutorType executorType) {
executorType = executorType == null ?
defaultExecutorType : executorType;
executorType = executorType == null ?
ExecutorType.SIMPLE : executorType;
Executor executor;
// 根据 executorType 创建相应的 Executor 实例
if (ExecutorType.BATCH == executorType) {...}
else if (ExecutorType.REUSE == executorType) {...}
else {
executor = new SimpleExecutor(this, transaction);
}
if (cacheEnabled) {
executor = new CachingExecutor(executor);
}
// 植入插件
executor = (Executor) interceptorChain.pluginAll(executor);
return executor;
}
|
newExecutor 方法在创建好 Executor 实例后,紧接着通过拦截器链 interceptorChain
为 Executor 实例植入代理逻辑。
1
2
3
4
5
6
7
8
9
10
11
12
13
14
15
16
17
18
19
20
21
22
23
| public class InterceptorChain {
private final List<Interceptor> interceptors =
new ArrayList<Interceptor>();
public Object pluginAll(Object target) {
// 遍历拦截器集合
for (Interceptor interceptor : interceptors) {
// 调用拦截器的 plugin 方法植入相应的插件逻辑
target = interceptor.plugin(target);
}
return target;
}
/** 添加插件实例到 interceptors 集合中 */
public void addInterceptor(Interceptor interceptor) {
interceptors.add(interceptor);
}
/** 获取插件列表 */
public List<Interceptor> getInterceptors() {
return Collections.unmodifiableList(interceptors);
}
}
|
它的 pluginAll 方法会调用具体插件的plugin方法植入相应的插件逻辑。如果有多个插件,则会多次调用 plugin 方法,最终生成一个层层嵌套的代理类。形如下面:
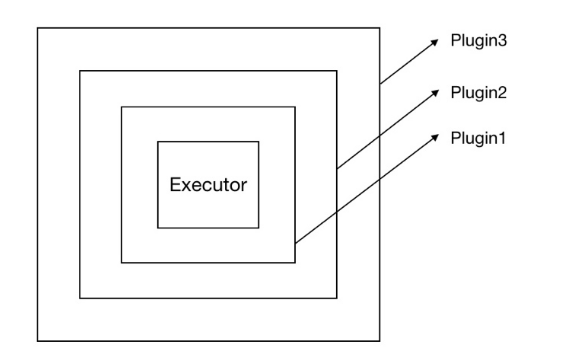
当 Executor 的某个方法被调用的时候,插件逻辑会先行执行。执行顺序由外而内
plugin 方法是由具体的插件类实现,不过该方法代码一般比较固定
1
2
3
4
5
6
7
8
9
10
11
12
13
14
15
16
17
18
19
20
21
22
23
24
25
| // -☆- ExamplePlugin
public Object plugin(Object target) {
return Plugin.wrap(target, this);
}
// -☆- Plugin
public static Object wrap(Object target, Interceptor interceptor) {
// 获取插件类 @Signature 注解内容,并生成相应的映射结构。形如下面
// {
// Executor.class : [query, update, commit],
// ParameterHandler.class : [getParameterObject, setParameters]
// }
Map<Class<?>, Set<Method>> signatureMap = getSignatureMap(interceptor);
Class<?> type = target.getClass();
// 获取目标类实现的接口
Class<?>[] interfaces = getAllInterfaces(type, signatureMap);
if (interfaces.length > 0) {
// 通过 JDK 动态代理为目标类生成代理类
return Proxy.newProxyInstance(
type.getClassLoader(),
interfaces,
new Plugin(target, interceptor, signatureMap));
}
return target;
}
|
plugin 方法在内部调用了 Plugin 类的 wrap 方法,用于为目标对象生成代理。Plugin
类实现了InvocationHandler接口,因此它可以作为参数传给Proxy的newProxyInstance方法。
